Global Import & Export
Global Import/Export packages your entire Rephlo configuration into a single archive in one operation. Unlike the per-entity exports (see Import & Export), this bundles every data type into one comprehensive ZIP.
What Gets Exported
Global Export can include all of your Rephlo data. Each type is an independent checkbox:
| Data Type | Description | Default |
|---|---|---|
| Commands | All commands, groups, and favorites | Selected |
| Spaces | Spaces with all files and content | Selected |
| History | Usage history with inputs/outputs | Selected |
| Providers | LLM provider configurations (API keys encrypted) | Selected |
| Conversations | Chat sessions with full message history | Selected |
| Settings | Application preferences | Selected |
API keys and secrets stay encrypted to the machine that created the export. They can only be decrypted on that same machine — see Cross-Machine Import.
Exporting Your Data
Step 1: Open Global Export
- Go to the File menu.
- Click Export All Data…
Step 2: Select What to Export
The Global Export dialog shows a checkbox per data type, each with its current count (e.g. "45 commands, 5 groups"; "28 conversations, 412 messages"). Tick the types you want.
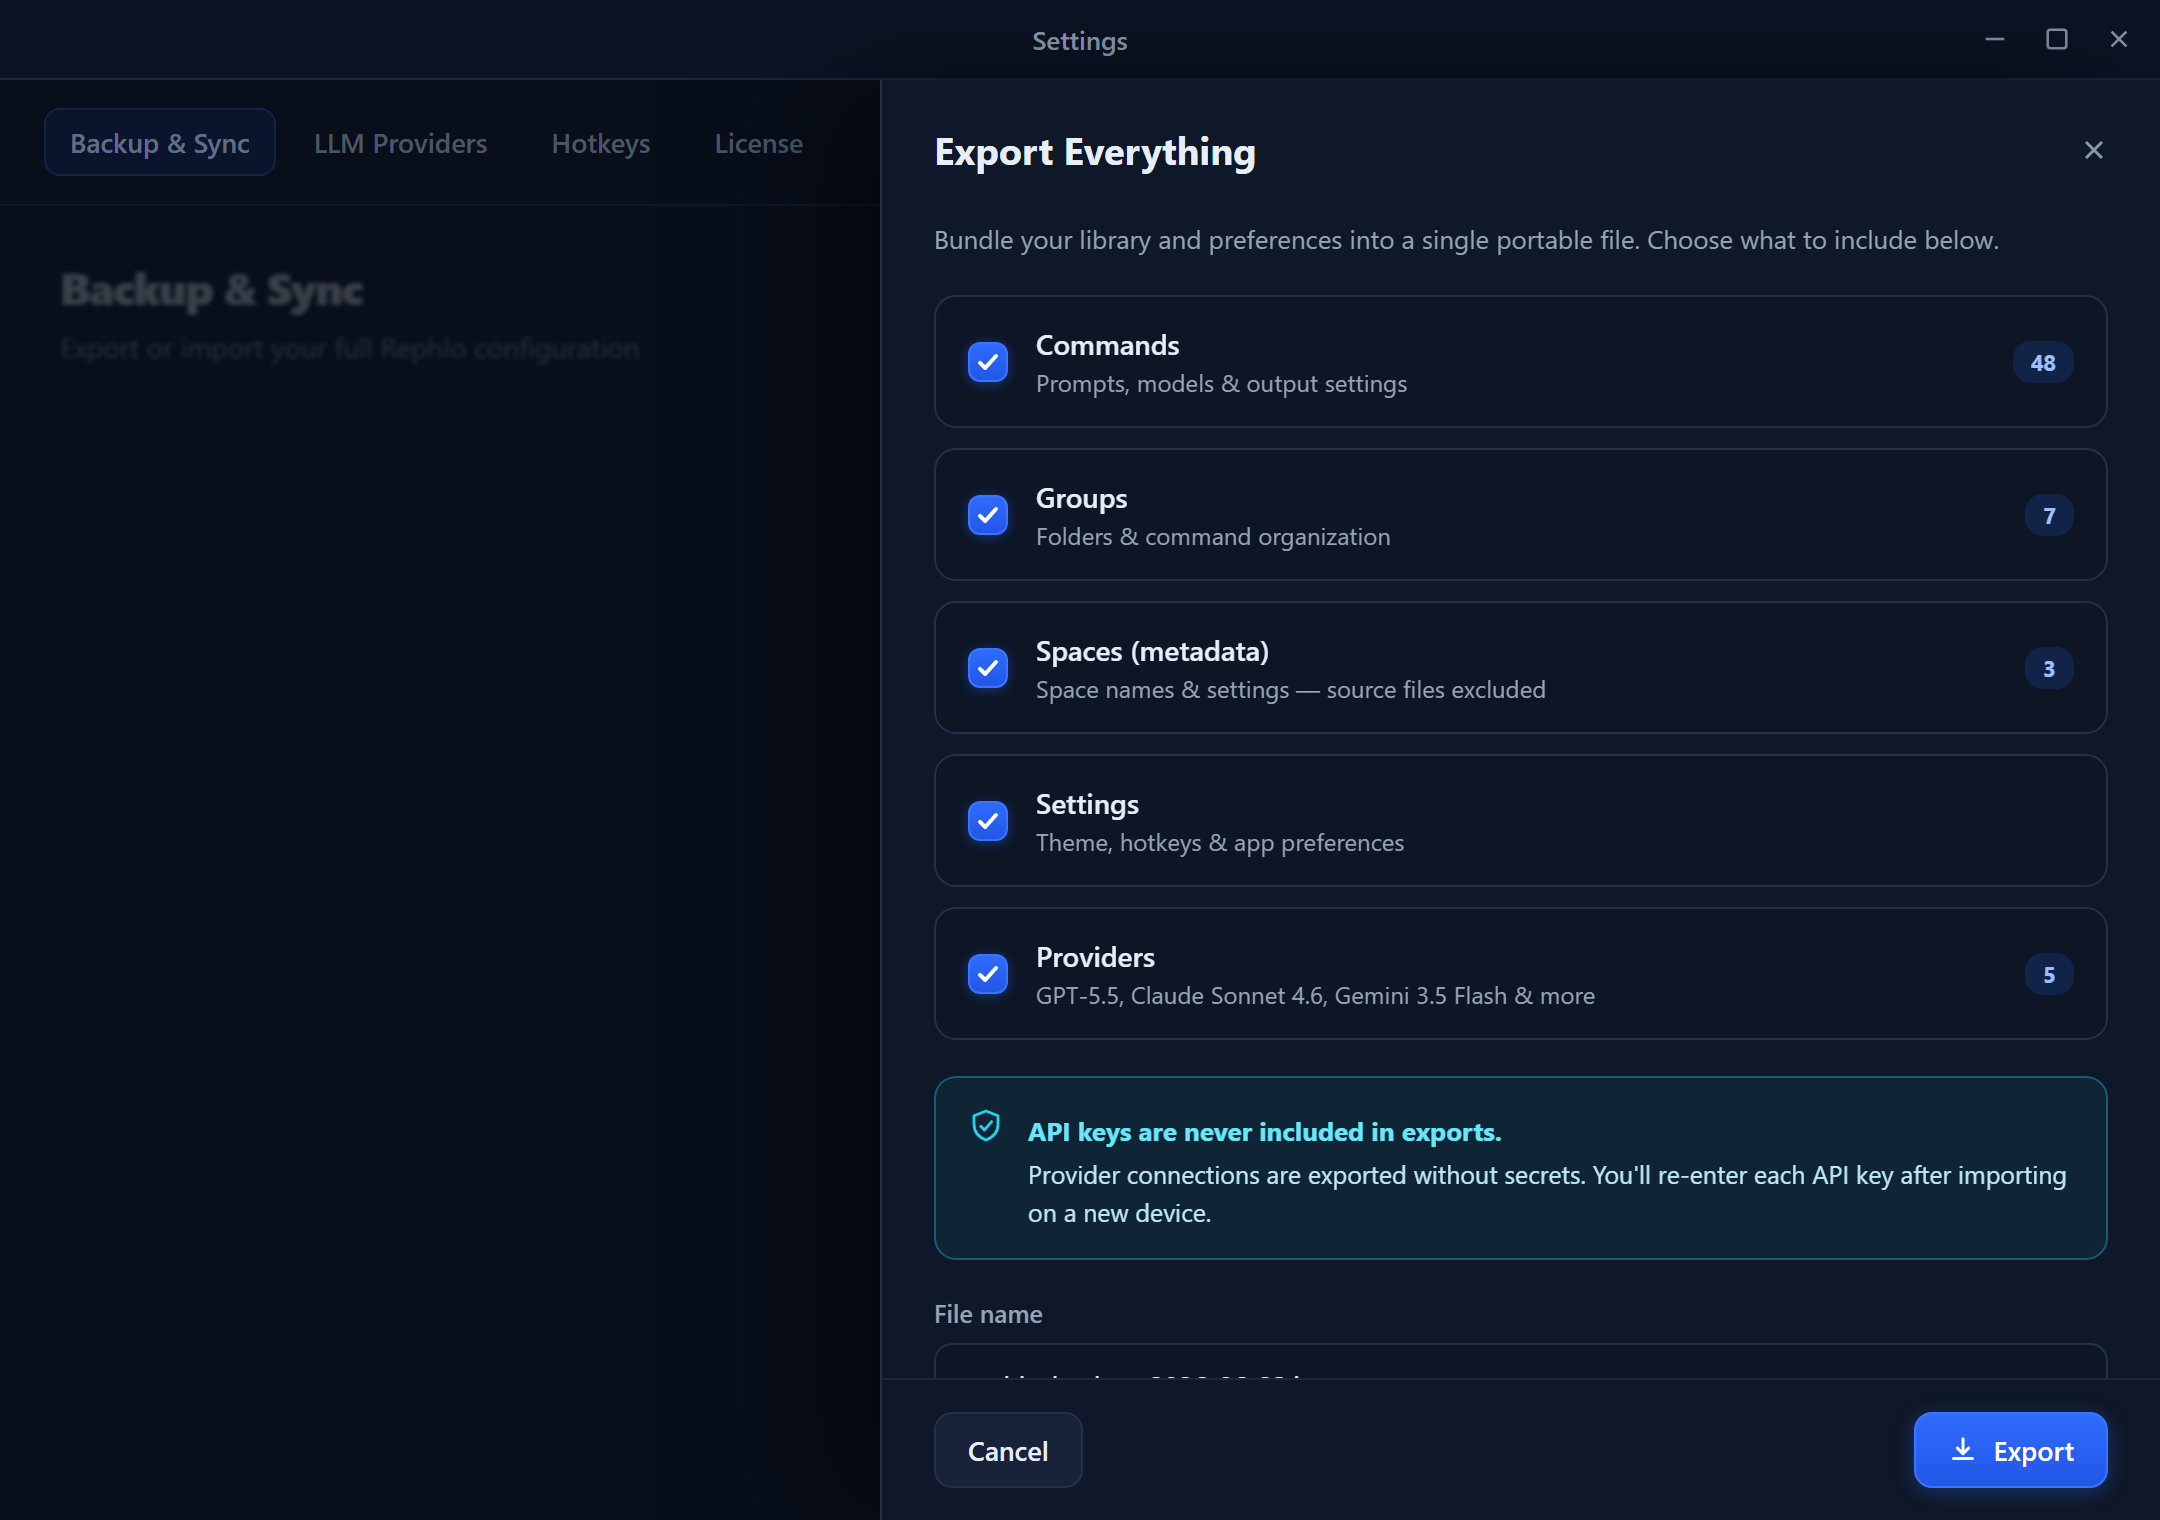
The Export All Data dialog lists Commands, Spaces, History, Providers, Conversations, and Settings — each with a count of how many items it contains and a checkbox. A summary line shows the total selected, and Cancel / Export… buttons sit at the bottom.
Step 3: Choose Location and Export
- Click Export….
- Choose a location and filename. The default name includes the date, e.g.
rephlo-backup-2026-01-20.zip. - Click Save.
Step 4: Wait for Completion
A progress dialog reports each phase as it runs — preparing commands, packaging spaces, exporting history, providers, conversations, settings, and finally creating the archive. When it finishes, you'll see a summary of what was exported. You can cancel mid-export if needed.
Importing Your Data
Step 1: Open Global Import
- Go to the File menu.
- Click Import All Data…
- Select your
.zipexport file.
Step 2: Review the Import Preview
Rephlo validates the archive and reads its manifest, then shows what will be imported: the archive's creation date, the app version that created it, the count per data type, and any conflicts. If the export came from a different machine, a warning notes that provider API keys will need to be re-entered.
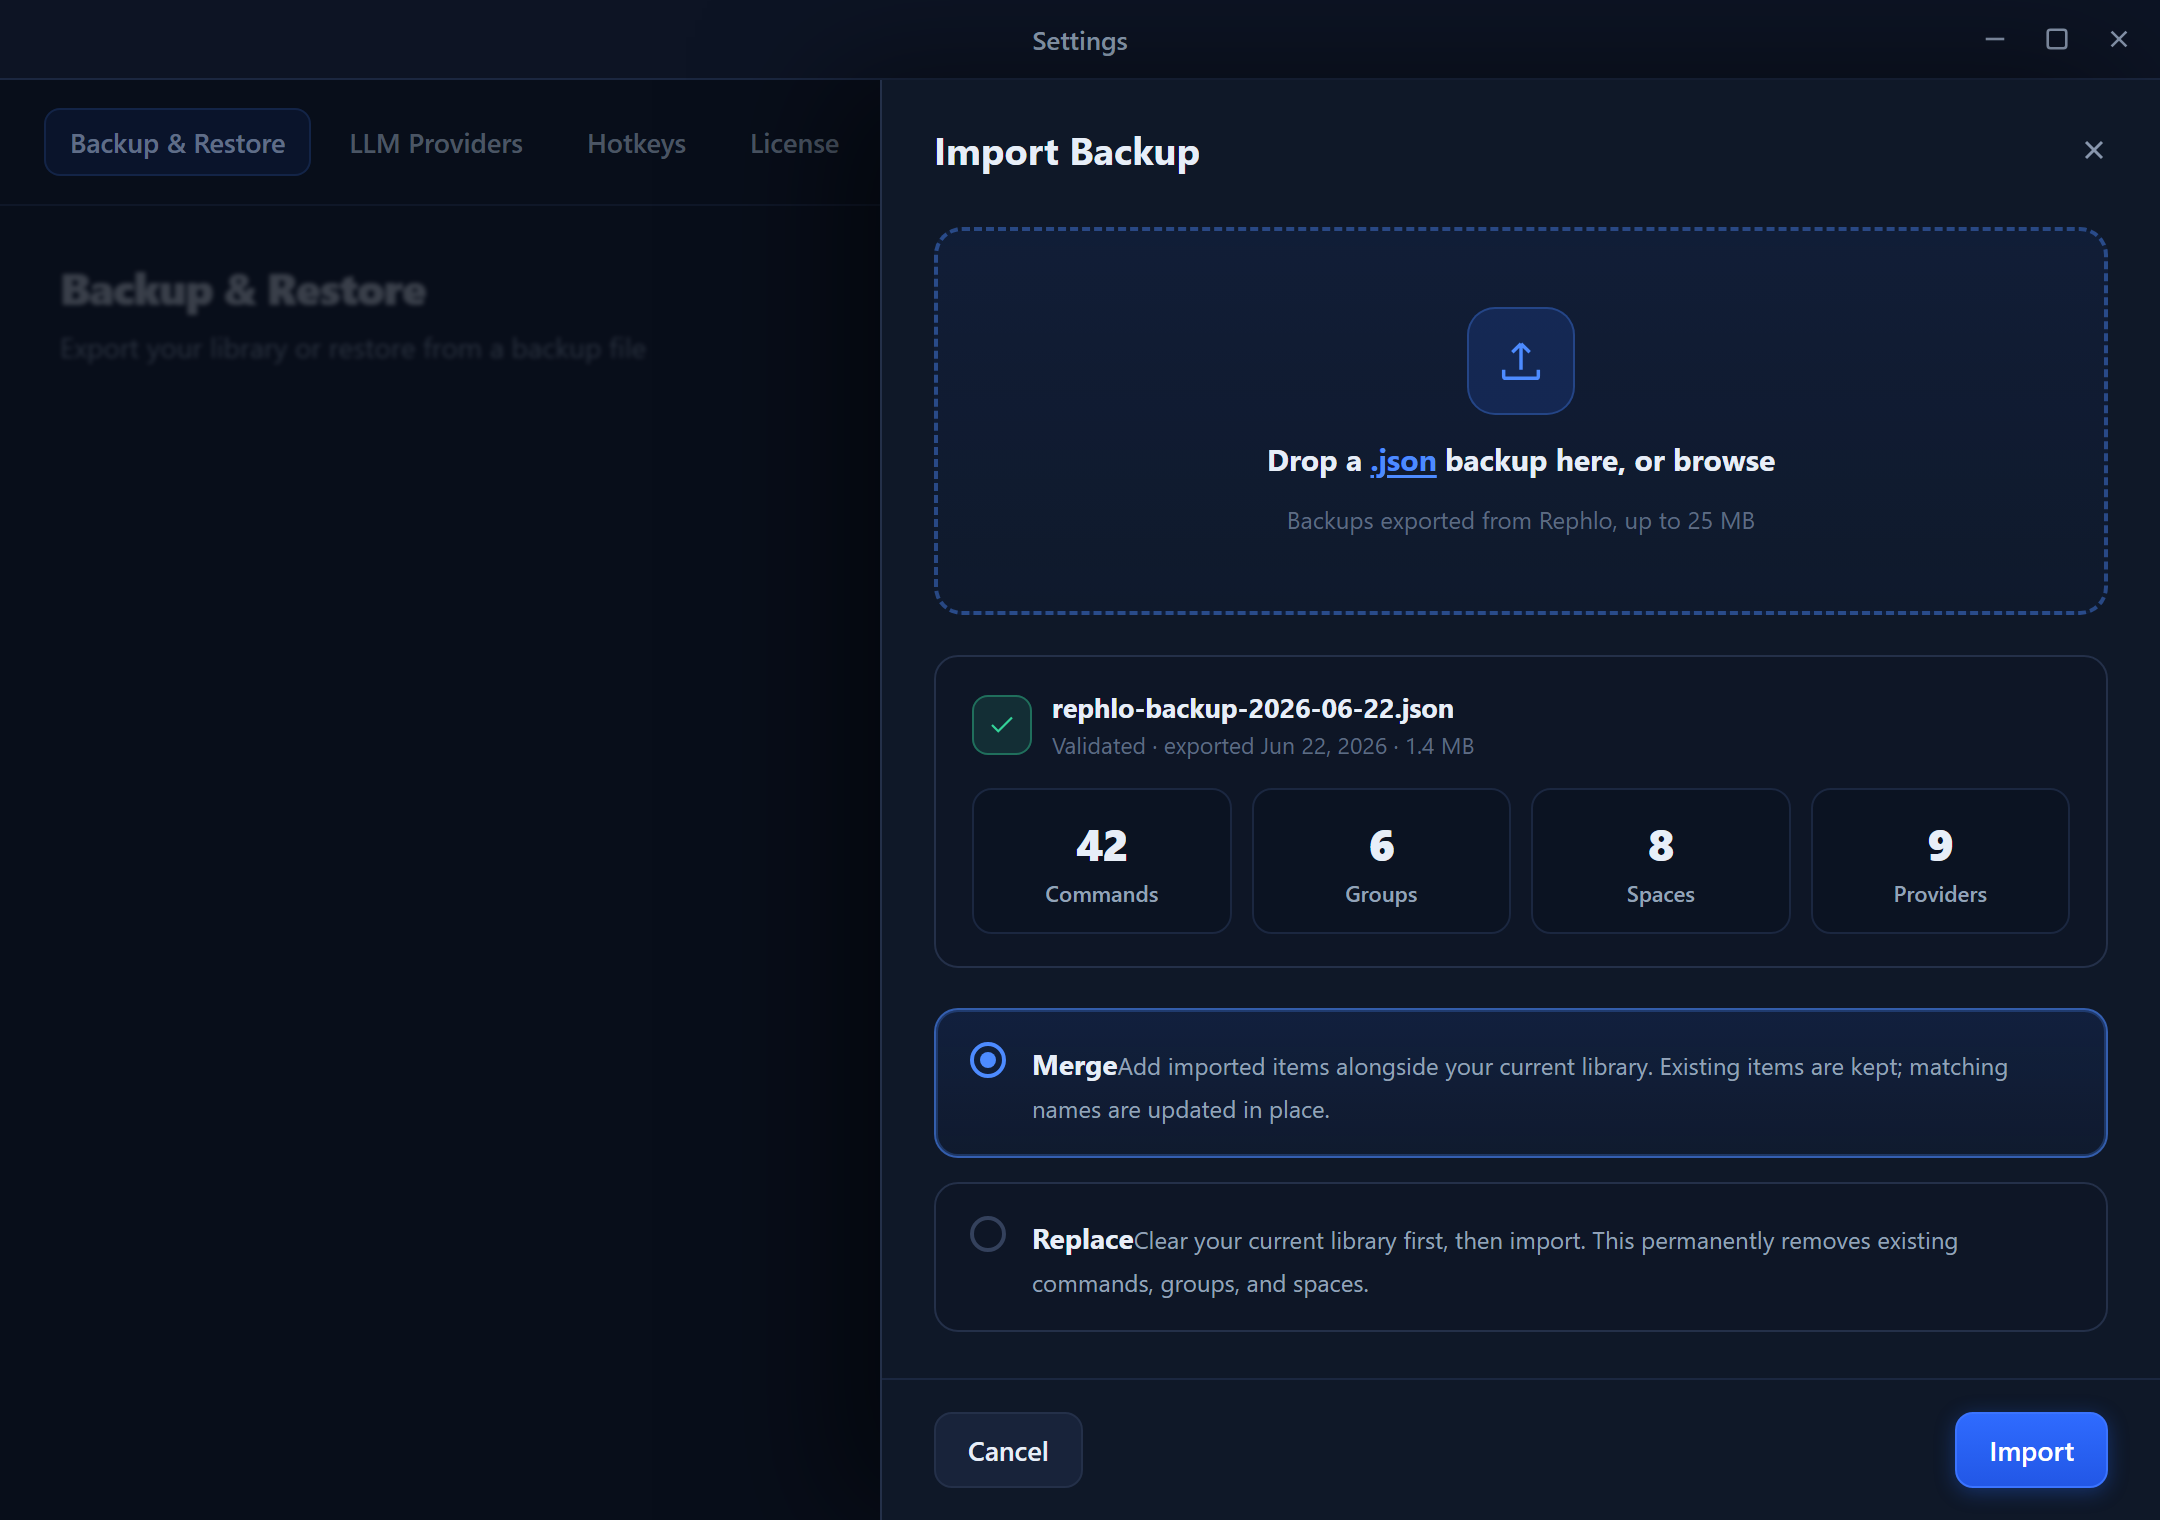
The Import All Data dialog shows the archive name, creation date, and version at the top. Below it, each data type lists its item count, the number of conflicts detected, and a resolution dropdown (Skip / Replace / Duplicate). History is appended rather than conflict-resolved. A warning banner appears when the export was created on a different machine.
Step 3: Configure Conflict Resolution
For each data type with conflicts, choose how to handle them:
| Option | Behavior |
|---|---|
| Skip | Keep your existing data; don't import conflicting items |
| Replace | Overwrite existing data with the imported versions |
| Duplicate | Import as new items with modified names (e.g. "Command (Imported)") |
Tip: Use Skip when merging into a working setup. Use Replace when restoring a backup onto a fresh installation. History records are appended, not merged by conflict.
Step 4: Import
- Click Import.
- A progress dialog reports each phase (commands, spaces, conversations, …).
- Review the summary when it finishes.
Conflict Resolution Explained
A conflict occurs when an imported item has the same name or identifier as an existing one.
When to Use Each Option
| Scenario | Recommended option |
|---|---|
| Restoring a backup onto a fresh install | Replace |
| Merging data from a teammate | Skip or Duplicate |
| Updating from an older backup | Replace |
| Trying out shared commands | Duplicate |
ZIP File Structure
Understanding the archive layout helps with troubleshooting or manual inspection:
The Manifest File
manifest.json records:
- Schema version (for forward compatibility) and the app version that created the export.
- The UTC export timestamp.
- A hashed machine identifier used to detect cross-machine imports.
- Per-type counts (commands, spaces, history records, providers, conversations, messages, plus archived command/space counts) and the total archive size.
Note on providers and settings: provider secrets live in the
providers/folder (encrypted), so provider-related keys are intentionally excluded from thesettings/export to avoid duplication.
Cross-Machine Import
When importing an archive created on a different computer:
What Works Normally
- Commands (instructions, groups, settings)
- Spaces (files and content)
- History (usage records)
- Conversations (chat sessions)
- Settings (preferences)
What Requires Attention
- Provider API Keys — encryption is machine-specific. After a cross-machine import, the affected providers come in with their keys cleared, and you must re-enter each key.
Why this is intentional: keys are never exported in plain text, so your credentials stay protected even if a backup file is shared by accident. Gateway (Dedicated API) providers are not exported at all — they're restored automatically when you sign in.
Common Use Cases
Complete Backup Before Reinstalling
- File > Export All Data…
- Select all data types.
- Save to an external drive or cloud storage.
- Note your API keys separately (they can't be decrypted after a reinstall).
- After reinstalling, use File > Import All Data…
- Re-enter API keys in Settings.
Setting Up a New Computer
- On the old computer, export all data.
- Transfer the ZIP to the new computer.
- Install Rephlo and import the ZIP.
- Re-enter API keys for each provider.
Sharing Configuration with a Team
- Export with Commands and Spaces selected.
- Deselect History, Providers, Conversations, and Settings (personal data).
- Share the ZIP.
- Teammates import using Duplicate to avoid overwriting their own commands.
A Clean, Privacy-Safe Backup
If you want a backup without sensitive data:
- Deselect Providers (encrypted keys), History (processed text), and Conversations (chat messages).
- Export only Commands and Spaces.
Best Practices
- Regular backups — export weekly or before major changes.
- Descriptive filenames — include the date, e.g.
rephlo-backup-2026-01-20.zip. - Secure storage — keep backups in encrypted cloud storage or on an external drive.
- Test restores — occasionally verify a backup imports cleanly.
- Document API keys — keep them in a password manager; they can't be recovered from a cross-machine backup.
- Version your backups — keep more than just the latest.
Troubleshooting
"Invalid archive" error during import
- The ZIP may be corrupted — re-download or re-copy it.
- Make sure it was created by Rephlo's Global Export (it must contain
manifest.json).
Missing data after import
- Check that the data type was selected for import.
- Review conflict resolution — items may have been Skipped.
Provider shows "API key required" after import
- Expected when importing from a different machine. Re-enter the key in Settings > Providers.
Import seems slow
- Large history files take longer to process.
- Spaces with many documents are processed individually.
- Consider excluding History for a faster import.
Next Section: Configure Rephlo to your preferences in Settings.